Hydroponic Farming at Home in India: 7 Easy Steps
Meta description (suggested): Hydroponic farming at home in India: a 2025 guide to DWC/NFT systems, kits, nutrients, pH/EC, LED lights, costs (INR), crops, setup steps, fixes, and a comparison table to get you growing fast.
Hydroponic farming at home in India is rapidly becoming a practical solution for urban growers and smallholders seeking higher yields with less water and land. Hydroponics means growing plants in nutrient-rich water instead of soil, allowing precise control of nutrients, faster crop cycles and year‑round production. It’s ideal for leafy greens, herbs, strawberries and certain vegetables in terraces, balconies and spare rooms in Indian apartments and small homes. If you’re wondering how to start hydroponic farming in India with minimal risk and cost, this step-by-step guide shows simple setups, the best systems for beginners (DWC and NFT), recommended nutrients, how to monitor pH and EC, LED lighting, the full cost breakdown in INR, and easy fixes to common issues.
“Starter DWC kit in India: INR 3,000–7,000; 40–60W LEDs support 6–8 plants for home setups.”
Quick Access: Apps, API, and Tools for Smarter Growing
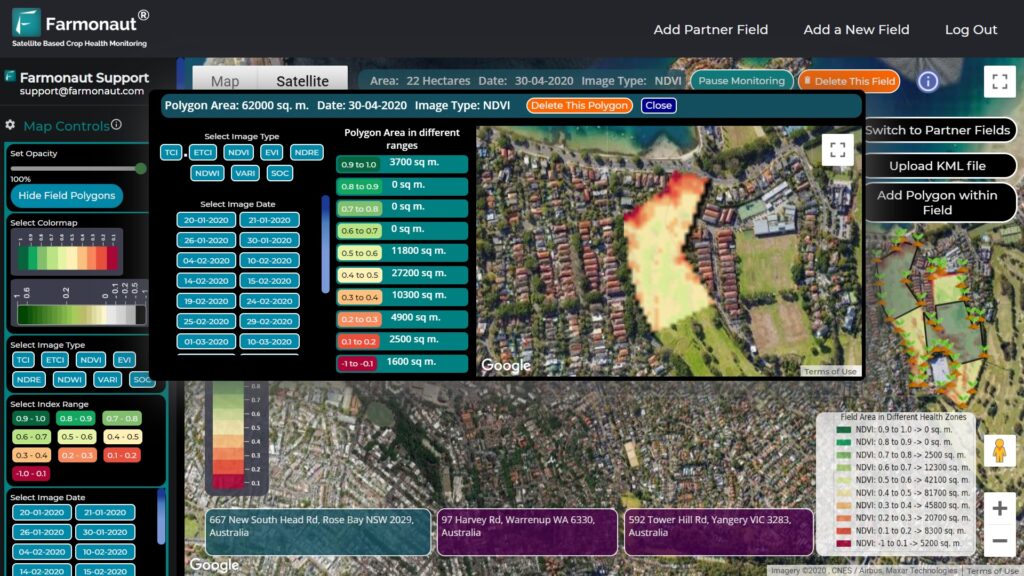
As you scale from a few trays to a mini terrace farm, reliable monitoring becomes essential. We provide satellite-driven insights, AI advisory, and traceability tools that can support your broader agriculture journey beyond your first hydroponic setup.


Farmonaut API | API Developer Docs
We also offer solutions that can help when you expand your growing or begin selling produce:
- Traceability: Build trust with buyers using blockchain-based traceability for clean, safe food from seed to sale.
- Carbon Footprinting: Track environmental impact and communicate sustainability benefits to eco‑conscious consumers.
- Crop Loans & Insurance: Satellite-based verification can simplify access to finance as you scale hydroponic production.
- Large-Scale Farm Management: When a home system grows into small farms, manage multi-location operations with satellite monitoring and AI advisory.
- Fleet Management: If you start local delivery for greens or herbs, optimize transportation and logistics with tracking and analytics.
We are a satellite technology company, not an online marketplace or a seller of farm inputs or machinery. Our platform focuses on real-time monitoring, AI advisory, traceability, and resource management to complement hydroponic projects as they scale.
Table of Contents
- What Is Hydroponics and Why It Fits Indian Homes
- Hydroponic Farming at Home in India: 7 Easy Steps
- Choosing the Right System: DWC, NFT, Kratky, Ebb & Flow, Drip, Aeroponics
- Costs, ROI and Budgeting in 2025 (INR)
- Home Hydroponic Systems Comparison (India)
- Essential Components: Pumps, Reservoirs, LEDs, Rockwool, and More
- Crops, Calendar and EC/pH Targets
- Troubleshooting: Algae, pH Drift, Clogs, Pests
- Selling, Food Safety, and Compliance (FSSAI)
- Hydroponic Farming Companies in India to Watch in 2025
- Sustainability Tips: Rainwater, Solar Pumps, Nutrient Reuse
- FAQ
What Is Hydroponics and Why It Fits Indian Homes
Hydroponics means growing plants in nutrient-rich water instead of soil. The roots sit in a solution that contains balanced nutrients, allowing precise control over what the plants get and when. For Indian homes—especially apartments with terraces, balconies or small spare rooms—this is a game changer. Hydroponic farming at home delivers higher yields with less land and up to 90% less water than traditional soil-based gardening. The ability to grow year-round, regardless of monsoons or heat waves, makes hydroponics a resilient choice for food security and fresh flavors.
In 2025, plug-and-play kits with modular channels, pre-mixed nutrient cartridges, submersible pumps, and LED grow lights are widely available. These systems are designed for apartments and small farms, making the start remarkably straightforward, even for beginners. With a few simple checks—pH, EC, and light—the system can run consistently for weeks, producing lettuce, spinach, basil, mint, pak choi, microgreens, and strawberries.
Urban AgTech Momentum in 2025
Hydroponic Farming at Home in India: 7 Easy Steps
Choosing the right system depends on space and goals, but these seven steps keep the process simple, affordable, and scalable.
Step 1: Pick a Stable Location with Power and Water
Pick a location with stable temperature and access to power. Indoors, a spare room or a corner near a window works. Outdoors, shaded terraces and balconies are great for leafy greens in Indian summers. Avoid areas with drastic temperature swings. Hydroponic plants thrive around 18–26°C. Good ventilation reduces fungal risk, and a nearby socket simplifies running pumps and LED lights.
- Target environment: 18–26°C; avoid >33°C without shade.
- Keep the reservoir out of direct sun to prevent algal growth and pH drift.
- Ensure a reliable power strip with surge protection for pumps and LEDs.
Step 2: Decide Crops for Faster Wins
Start with low-risk, fast crops: lettuce, spinach, basil, mint, pak choi and microgreens. These mature in 3–6 weeks, ideal for first harvests and quick learning cycles. As confidence grows, consider strawberries and certain vegetables like chillies and cherry tomatoes—but fruiting crops take longer and need larger systems, stronger light, and pollination support.
- Leafy greens: 3–5 weeks from transplant to harvest.
- Herbs (basil, mint): 4–6 weeks, then multiple cuts.
- Strawberries: 8–12 weeks; prefer cooler spots and consistent EC.
- Tomatoes/peppers: 10–14+ weeks; need bigger root volume, higher EC and trellising.
See Mobile Vertical Hydroponics in Action
Step 3: Choose Your System (Beginner to Advanced)
For beginners, Deep Water Culture (DWC) is the simplest. Nutrient Film Technique (NFT) suits longer rows and multiple plants. Ebb & flow and drip systems handle varied crop sizes. Aeroponics maximizes oxygenation but needs more monitoring. Ready-made hydroponic farming at home kit options—especially DWC trays with reservoirs—are affordable in India in 2025.
- DWC (Deep Water Culture): Easiest for leafy greens and herbs. Roots sit in aerated nutrient solution.
- NFT (Nutrient Film Technique): A thin film of nutrient solution flows through channels. Great for rows of lettuce and basil.
- Kratky: Passive version—no pump. Best for very small, low-maintenance setups.
- Ebb & Flow: Periodically floods and drains. Good for mixed crops with inert media like clay pebbles.
- Drip: Feeds each pot via emitters. Useful for fruiting crops and larger root systems.
- Aeroponics: Mists roots with nutrients, maximizing oxygenation. Advanced and high-maintenance.
The Smart Farming Future
Step 4: Buy a Kit or Assemble the Components
You can buy a home kit or assemble your own components. A typical starter DWC or NFT needs:
- Reservoir: Food-grade tub or bucket (opaque) to hold the nutrient solution.
- Submersible pump and/or air pump/stone: For water circulation (NFT/ebb & flow) and oxygenation (DWC).
- Grow channels or net pots: NFT channels for rows, or net pots for DWC buckets/trays.
- Inert media: Rockwool, coco coir, and clay pebbles to support roots without soil.
- LED grow light (indoors): Full-spectrum LED, typically 40–100W for a 2×2 ft area.
Hydroponic farming at home kits in India often include pumps, channels, and pre-mixed nutrient cartridges, with clear instructions for quick setup. Modular systems make expansion easy—add more channels as you grow.
Hydroponic Berries and Controlled Environments
Step 5: Mix Nutrients, Monitor pH and EC
Use hydroponic-specific nutrient solutions. Start with a two- or three-part formula made for leafy greens and herbs. Add nutrients to water as directed, then adjust pH and EC.
- pH: Target 5.5–6.5 for most crops. Use pH up/down solutions to correct.
- EC (electrical conductivity): Measure nutrient strength. Typical range: 1.0–1.8 mS/cm for leafy greens; higher for fruiting crops.
- Water: Use filtered or RO water where possible to avoid high hardness that can cause pH drift.
Monitor daily at first, then every few days as the system stabilizes. Top up with plain water to maintain reservoir levels, and recheck EC/pH after topping up.
Foundations for Productive Plants
Step 6: Start Seedlings and Transplant Carefully
Seedlings can be started in rockwool plugs, coco plugs, or small net cups. Keep them moist but not waterlogged. Once the first true leaves appear and roots peek out, transplant to your system.
- Rockwool: Soak cubes in pH 5.5 water before seeding. Keep warm and humid for fast sprouting.
- Transplanting from soil: Rinse roots gently to remove soil, reducing disease risk in systems.
- Spacing: Give lettuce 15–20 cm spacing in channels; basil similar; mint can be closer.
Elevated Beds vs Hydroponic Channels
Step 7: Light, Airflow, and Routine Monitoring
If indoors, provide 14–16 hours of LED light for leafy greens. Outdoors, aim for 4–6 hours of gentle sun and partial shade in hot Indian summers. Maintain airflow with a small fan to prevent fungal issues. Keep a simple log of pH, EC, and temperature. With consistent routines, systems can run for weeks with minimal intervention.
- LED lights: 40–100W for a 2×2 ft area. Adjust height to prevent leaf burn.
- Oxygenation: Keep air stones bubbling in DWC. NFT relies on constant flow for oxygen.
- Sanitation: Wipe down channels and lids; keep light out of reservoirs to reduce algae.
Precision Tech for Home Growers
Choosing the Right System for Your Space and Goals
Hydroponic farming at home in India revolves around system choice. Here’s how each system aligns with space, crops, and maintenance levels:
- DWC (Deep Water Culture): The simplest entry point for beginners. Best for leafy greens, herbs, and consistent harvest cycles. Minimal moving parts beyond an air pump.
- NFT (Nutrient Film Technique): Efficient for longer rows and multiple plants. Needs careful monitoring to avoid clogged channels and ensure even flow.
- Kratky: Truly passive; perfect for classrooms, kids, or extremely low-maintenance home setups. Works well for lettuce and basil.
- Ebb & Flow: Handles a mix of crops, including larger herbs and some fruiting varieties, using clay pebbles or coco coir in net pots.
- Drip: Good for larger plants—tomatoes, peppers—where individual emitters deliver nutrients. More parts to maintain but flexible.
- Aeroponics (advanced): Maximizes oxygenation, but sensitive to power cuts and clogs; better once you’re comfortable with daily monitoring.
Costs, ROI, and Budgeting in 2025 (INR)
Costs vary with size and features. In 2025, many home kits are plug-and-play with LED lights and pumps included. Here’s a practical breakdown:
- Basic kits: Around INR 3,000–8,000 for DWC trays/buckets or small NFT starter kits (6–12 plants).
- Mid-range modular systems: INR 15,000–50,000. Good for 20–80 plants, multiple channels, and timer controls.
- Larger smart terrace gardens: INR 50,000–2,00,000. Greater capacity, automation, LED arrays, sensors.
Operational costs: Electricity for pumps and lights, plus nutrients and replacement media. Expect INR 200–900/month depending on LED wattage and hours. Many home setups reach break-even within 6–18 months by reducing grocery bills and selling surplus locally to neighbors or community groups.
Smart Plant Monitoring
Home Hydroponic Systems Comparison (India)
Use this scannable matrix to choose the right system for your home, terrace, or balcony. Values reflect typical Indian conditions and 2025 pricing.
| System Type | Ideal Crops | Est. Kit Cost (INR) | Est. DIY Cost (INR) | Plant Capacity | Recommended LED (W for 2×2 ft) | Monthly Power Cost (INR) | Water Use/Cycle (L) | Nutrient Use (ml/week) | Target pH | Target EC (mS/cm) | Space (sq ft) | Difficulty | Maintenance | Common Issues | Quick Fix |
|---|---|---|---|---|---|---|---|---|---|---|---|---|---|---|---|
| DWC (Deep Water Culture) | Leafy greens, basil, mint | 3,000–12,000 | 1,500–6,000 | 6–20 | 60–100W | 200–500 | 20–50 | 50–120 | 5.5–6.3 | 1.0–1.6 | 4–8 | Beginner | Weekly | Algae, pH drift, low oxygen | Opaque lids, buffer pH, backup air pump |
| NFT (Nutrient Film Technique) | Lettuce rows, herbs | 10,000–50,000 | 6,000–20,000 | 20–80 | 100–150W | 400–900 | 40–120 | 150–300 | 5.8–6.2 | 1.2–1.8 | 8–20 | Intermediate | 2× weekly | Clogged channels, uneven flow | Inline filter, flush channels |
| Kratky (Passive) | Lettuce, basil | 2,000–5,000 | 500–2,000 | 4–12 | 40–60W | 0–300 | 10–30 | 30–80 | 5.5–6.5 | 1.0–1.4 | 2–4 | Beginner | Minimal | Stalled growth (low O2) | Leave air gap; upgrade to DWC |
| Ebb & Flow | Mixed greens, herbs, small fruits | 15,000–60,000 | 8,000–25,000 | 12–40 | 100–150W | 300–800 | 40–100 | 120–240 | 5.8–6.2 | 1.2–2.0 | 10–16 | Intermediate | Weekly | Salt buildup, timer issues | Flush media, spare timer |
| Drip | Tomato, chilli, pepper | 12,000–50,000 | 5,000–20,000 | 10–30 | 100–150W | 250–700 | 30–80 | 120–250 | 5.8–6.3 | 1.5–2.2 | 8–20 | Intermediate | 2× weekly | Emitter clogging | Filter + acid flush |
| Apartment-Friendly Pick | Lettuce, spinach, basil | 6,000–15,000 | 3,000–7,000 | 8–12 | 60–80W | 150–400 | 20–40 | 60–120 | 5.8–6.2 | 1.2–1.6 | 3–5 | Beginner | Weekly | Light leaks → algae | Opaque reservoir, lid covers |
| Budget Pick | Leafy greens | 800–2,000 | 300–800 | 6–10 | 40–60W | 0–250 | 10–20 | 30–60 | 5.5–6.5 | 1.0–1.2 | 2–3 | Beginner | Minimal | Tip burn | Dilute nutrients, add Ca/Mg |
Legend: EC = Electrical Conductivity; L = Litres; W = Watts; sq ft = square feet
“Ideal hydroponic pH 5.5–6.5; EC 1.2–1.8 mS/cm; light 14–16 hours for leafy greens.”
Essential Components: Pumps, Reservoirs, LEDs, Rockwool, and More
Here’s what each part does, why it matters, and how to size it for home hydroponics in India.
- Reservoir: Choose food-grade, opaque plastic. Size 20–60L for small DWC/NFT setups. Keep covered to block light and prevent algae.
- Submersible pump: Needed for NFT, ebb & flow, and drip. Look for 400–1000 LPH for small systems. Use a mechanical pre-filter to avoid clogs.
- Air pump & stones: Essential for DWC oxygenation. One 3–5W pump with dual outlets can aerate 6–8 heads of lettuce.
- Channels and net pots: NFT channels with 50–75 mm net pots are standard. For DWC, 2–3 inch net pots fit bucket lids or tote lids.
- Inert media: Rockwool for starting seedlings; clay pebbles for pot stability and airflow; coco coir for drip or ebb & flow. Rinse media before use.
- LED grow lights: Full-spectrum LEDs minimize heat and power costs. For a 2×2 ft area, 40–100W is adequate for greens. Keep LEDs 25–45 cm above canopy and dim/raise if leaf edges curl.
- Timers and meters: A digital timer controls pumps and lights. A pH pen and EC meter are non-negotiable for consistent results.
Crops, Calendar and EC/pH Targets
Plan plantings in waves every 1–2 weeks to ensure continuous harvests. Staggering prevents glut and shortages.
- Leafy greens (lettuce, spinach, pak choi): Transplant to harvest in 3–5 weeks; pH 5.8–6.2; EC 1.0–1.6.
- Herbs (basil, mint): 4–6 weeks to first cut, then cut every 1–2 weeks; pH 5.8–6.3; EC 1.2–1.8.
- Strawberries: 8–12+ weeks depending on variety and temperature; pH 5.8–6.2; EC 1.2–1.6. Pollinate by gently shaking flowers or using a soft brush.
- Tomatoes/peppers (larger systems): 10–14+ weeks; pH 5.8–6.3; EC 1.8–2.2. Provide trellis and good airflow.
For Indian summers, consider heat-tolerant lettuce (e.g., romaine, loose-leaf) and provide partial shade on balconies. In cooler months, growth is vigorous on terraces with direct sun. Maintain consistent nutrient strength; rapid EC swings can stress roots, causing tip burn.
Troubleshooting: Algae, pH Drift, Clogs, Pests
Even well-designed setups face occasional problems. Here’s how to recognize and fix the most common issues quickly.
- Algal growth (green slime): Caused by light in the reservoir or channels. Solution: use opaque reservoirs and lids, tape light leaks, and clean with diluted food-safe peroxide between cycles.
- pH drift: Common with hard water. Solution: use filtered water; add pH down in small increments; maintain a stable nutrient buffer; avoid overfeeding.
- Clogged lines (NFT, drip): Prevent with mesh filters and periodic flushing. If flow slows, open and rinse channels; soak emitters in diluted acid (citric) to dissolve salts.
- Pests (aphids, thrips): Inspect undersides of leaves weekly. Use sticky traps and neem-based sprays labeled for edible crops. Keep airflow steady to deter fungus gnats.
- Root rot (brown, smelly roots): A sign of low oxygenation or high temperatures. Lower solution temperature if possible; increase air pump capacity; consider adding a chiller or frozen water bottle in peak summer.
- Tip burn (lettuce edges crisp): EC too high or calcium deficiency. Reduce EC by 10–20% and supplement with a Ca/Mg product per label.
Selling, Food Safety, and Compliance (FSSAI)
If selling surplus, comply with local market rules and FSSAI labeling requirements. Keep a simple batch log of planting dates, nutrient schedules, and harvest dates. Food safety is paramount: sanitize equipment between cycles and avoid untreated wastewater. Offer value-added products such as washed, packed microgreens and mixed salad boxes. Transparent labeling builds trust, especially in urban neighborhoods and RWAs.
Hydroponic Farming Companies in India to Watch in 2025
Hydroponic farming companies in India are offering subscription kits, remote monitoring, and installation services. Leading names include Farmizen, vGreen, and EcoFarms, among several startups helping Indian home growers. State agricultural departments and Krishi Vigyan Kendras provide training and subsidies in some states. When evaluating companies, look for:
- Clear nutrient schedules and pH/EC guidance.
- Warranty on pumps and LEDs, plus easily replaceable parts.
- Responsive customer support and practical documentation.
- Modular channels and scalable designs for apartments and terrace gardens.
For larger ambitions beyond the home, we provide satellite-based monitoring, AI-driven advisories, and blockchain traceability to help you professionalize production and sales. Explore our Traceability for compliant selling, Carbon Footprinting for sustainability metrics, and Large-Scale Farm Management to manage multiple sites as your hydroponic venture grows.
Explore Farmonaut Subscriptions
We offer subscription plans designed to make satellite-driven insights accessible and affordable as you scale from home setups to small farms.
Sustainability Tips: Rainwater, Solar Pumps, Nutrient Reuse
- Rainwater harvesting: Capture monsoon water in a clean tank and filter before use. Soft water helps stabilize pH.
- Solar for pumps: Small 20–50W panels can offset air or submersible pump power for balcony systems.
- Nutrient reuse: When changing solutions, reuse nutrient-rich runoff for outdoor ornamentals or lawns—avoid discharge into drains.
- Waste reduction: Choose reusable net pots and long-lasting clay pebbles; compost plant roots and trimmings.
Putting It All Together: A Sample Apartment Setup
Consider a compact DWC on a balcony in Bengaluru or Pune. Use a 40–60W LED if light is low, a 30–40L reservoir, and an air pump with two stones. Start with six lettuce and two basil plants. Keep pH at 5.8–6.2 and EC around 1.2–1.6 mS/cm. In 4–5 weeks, begin harvesting outer leaves every few days. Re-seed every 10–14 days for continuous greens. A setup like this often costs around INR 5,000–8,000 and pays for itself within a year through grocery savings alone.
When You’re Ready to Scale
Upgrading to an NFT with 20–40 sites brings steady weekly harvests. Add a mechanical filter and keep channels clean. With more plants, your routine shifts from daily observation to scheduled maintenance—EC checks, pH adjustments, and a monthly deep clean.
For entrepreneurs selling locally, we can provide the digital backbone for traceability and environmental reporting to win trust and meet buyer expectations. See Traceability and Carbon Footprinting. If you plan a distributed delivery model for weekly greens boxes, our Fleet Management helps streamline routes and reduce costs.
FAQ: Hydroponic Farming at Home in India
Q1. What’s the best hydroponic system for beginners at home?
A: DWC is the simplest and most forgiving. Pair a basic DWC tray or bucket with an air pump and 40–60W LED, and you can grow 6–8 heads of lettuce or herbs reliably.
Q2. How many hours of light do leafy greens need indoors?
A: Provide 14–16 hours with a dark rest of 8–10 hours. Keep LEDs 25–45 cm above the canopy and adjust if edges curl or bleach.
Q3. How often do I change the nutrient solution?
A: Top up with plain water as plants drink. Fully change and clean the reservoir every 2–3 weeks for small systems, or sooner if you notice odor or cloudiness.
Q4. What should my pH and EC be?
A: For leafy greens, pH 5.8–6.2; EC 1.0–1.6 mS/cm. For fruiting crops like tomatoes, EC 1.8–2.2 mS/cm.
Q5. Can I use tap water?
A: Many Indian cities have hard water that causes pH drift and salt buildup. Filtered or RO water is preferred. If using tap water, let it sit 24 hours and test pH/EC before mixing nutrients.
Q6. Are home hydroponics safe for food?
A: Yes, if you maintain sanitation. Clean equipment regularly, handle nutrients as per label, and avoid untreated wastewater. Keep pets away from reservoirs.
Q7. How much does it cost to run a small system each month?
A: Expect INR 200–900/month in electricity and nutrients depending on LED wattage, hours of operation, and local power costs.
Q8. Can I sell my produce?
A: Yes, locally to neighbors or community groups. For formal sales, comply with FSSAI and local rules. Label varieties and dates clearly and keep basic batch records.
Q9. Is NFT better than DWC?
A: Neither is universally “better.” DWC is simplest, while NFT is efficient for longer rows and higher counts. Start with DWC; move to NFT when you want more capacity and are comfortable with routine monitoring.
Q10. How do I prevent pests indoors?
A: Keep the area clean, ensure airflow, use sticky traps, and inspect leaves weekly. Neem-based sprays labeled for edibles can help. Quarantine any new plant before adding it to your system.
Why Hydroponics Makes Sense in India—2025 and Beyond
Hydroponic farming at home in India is becoming the preferred solution for urban growers and smallholders seeking higher yields from less land and water. With precise control of nutrients, faster cycles, and compact systems, it fits Indian apartments, terraces, balconies, and spare rooms. Kits, pumps, modular channels, and LED lights are widely available, and many companies are offering support and training for Indian households. As cities get denser and water becomes costlier, hydroponics offers a stable path to fresh, high-quality food and community-based selling.
How We Can Help When You Scale
We deliver satellite-based monitoring, AI advisory, and blockchain traceability to support growers as they expand from home setups to small farms. Our platform provides real-time monitoring, resource management tools, and environmental impact tracking. Explore:
- Farmonaut Web & Mobile Apps for access on Android, iOS, and web.
- Farmonaut API and Developer Docs for integrating insights into your workflows.
- Traceability, Carbon Footprinting, Large-Scale Farm Management, and Fleet Management for professional operations.
Final Checklist: Start Today
- Pick a stable location with power and shade.
- Decide crops: lettuce, spinach, basil, mint, pak choi.
- Choose system: DWC for simplest start; NFT for rows.
- Buy a hydroponic farming at home kit or assemble parts: reservoir, net pots, rockwool, pumps, LED.
- Mix nutrient solutions; monitor pH 5.5–6.5 and EC 1.0–1.8 mS/cm.
- Transplant seedlings; maintain 14–16 hours light for greens.
- Clean regularly; troubleshoot early; stagger plantings every 1–2 weeks.
With modest investment and careful monitoring, hydroponic farming at home becomes an efficient, sustainable way to bring fresh food to the table—week after week.